Help NavigationChoosing a SequenceUsing the Search PageSearch PreviewPlasmid EditorFeatures Tab+ New Feature TabRestriction Sites TabOptions TabBLAST Plasmid NucleotidesCodon OptimizationSaving Edits for LaterMap ViewText EditorDownload Text MapHeader
Choosing a Sequence
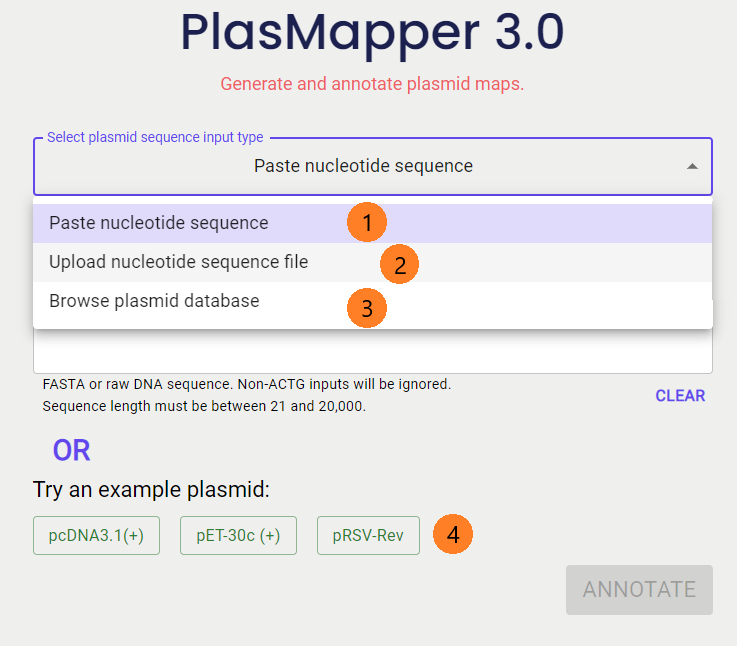
The PlasMapper 3.0 server provides several ways to generate a plasmid map.
1. You can enter a plasmid DNA sequence as text. This can be pasted into the text box, where any characters other than 'a', 'A', 't', 'T', 'g', 'G', 'c', or 'C' will be removed before annotation. You may also paste in your fasta formatted sequence file (starts with ">") where the header will be used as the initial plasmid title. You can edit this title in the editor's "Options" tab.
2. Another option is to upload a FASTA or raw sequence file containing your plasmid DNA sequence. This file may either contain just the sequence itself or the sequence along with a header that starts with ">".
3. If you don't already have a plasmid in mind, browse our plasmid database to find one. The database has many filters you could use such as expression system, name, etc.
4. You can also choose from our example plasmids to conveniently test out the plasmid editor.
Using the Search Page
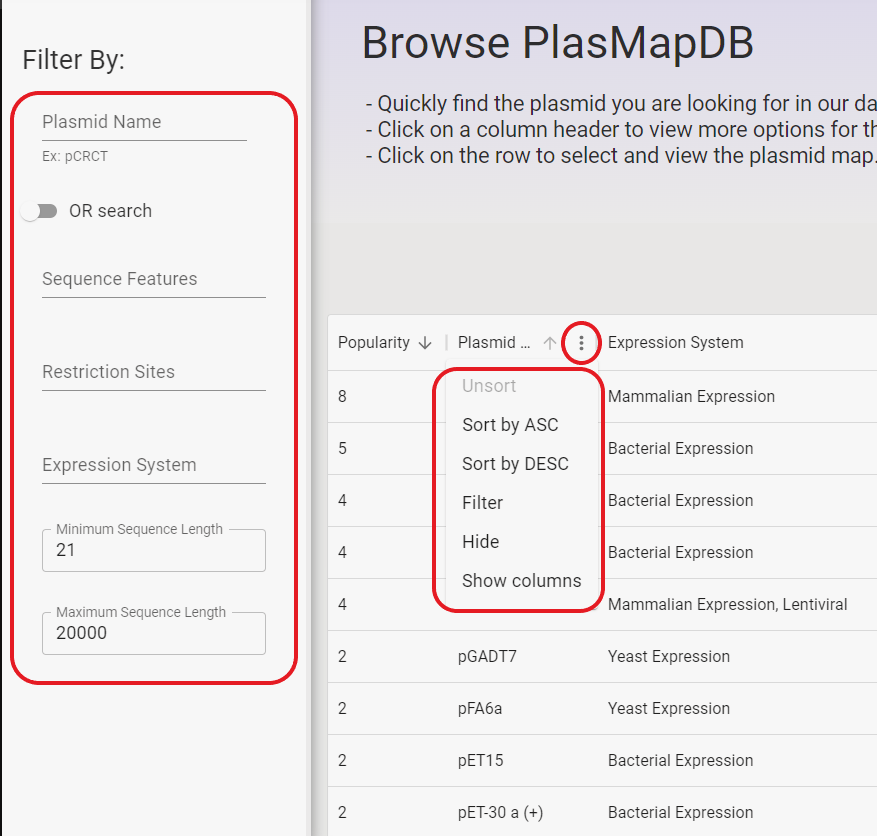
The PlasMapper 3.0 database allows users to filter plasmids by plasmid name, sequence features, restriction sites, expression system, and sequence length.
A table of results will be displayed beside the filtering options.
Sequence features, restriction sites, and expression system can be searched for multiple values at a time.
There is a dropdown menu that autofills suggestions as you type. By default, it searches for any plasmid with at least one of the selected attributes per field.
If you click on the toggle that says "OR Search", it will switch to "AND Search" and instead search for all plasmids with all of the chosen attributes.
Search Preview

Click on any table row to open up a preview.
1. A visual preview of the features
2. The DNA sequence
3. Click here to open it up in the main editor
Plasmid Editor
There are many aesthetic and feature related customizations that can be made in the plasmid editor.
On the left hand side, there are 6 tabs.
Features Tab

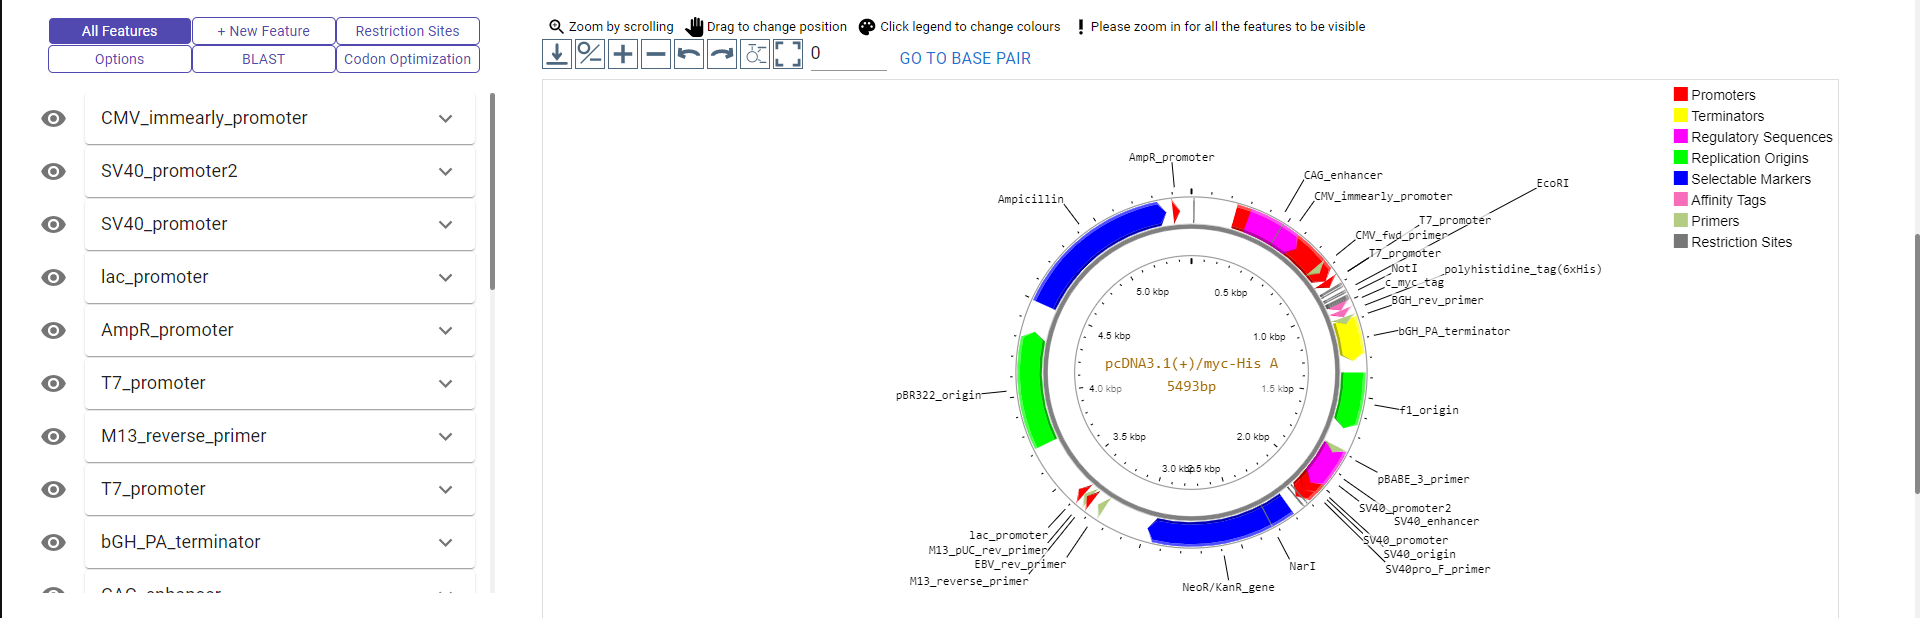
The "Features" tab allows users to view all the current features on the map such as Origin of Replication, Promoters, Terminators, etc.
1. Tap on the "Options" tab to open the tab.
2. Type in the name to edit the annotation on the map and press on the 'save' icon to apply the change.
3. Select the feature category. This will appear on the legend of the map.
4. Set the 'start' and 'stop' positions of the feature. You may use the up/down arrows or type it in.
5. Set the strand of the feature.
6. Quickly hide or reveal specific features by clicking the eye icon.
7. Besides pressing the arrow on the right side of a feature panel, you may also tap on the feature on the map to open/close the feature in the "Options" tab.
+ New Feature Tab

The "Add Feature" tab allows users to add their own custom features to their plasmid maps. Simply fill out the feature details and then click the "Add Feature" button to update the map. Note: if start position is higher than stop position, the feature will be created on the (-) strand by default. This can be changed in the "All Features" tab by openning the corresponding feature.
Restriction Sites Tab

The "Restriction Sites" tab allows users to select which restriction sites will be shown on the map.
By default, restriction sites that appear once are shown.
Simply check or uncheck any box to show or hide the corresponding restriction site. This tab also shows the number of occurrences of each restriction site in the given plasmid DNA sequence.
Options Tab
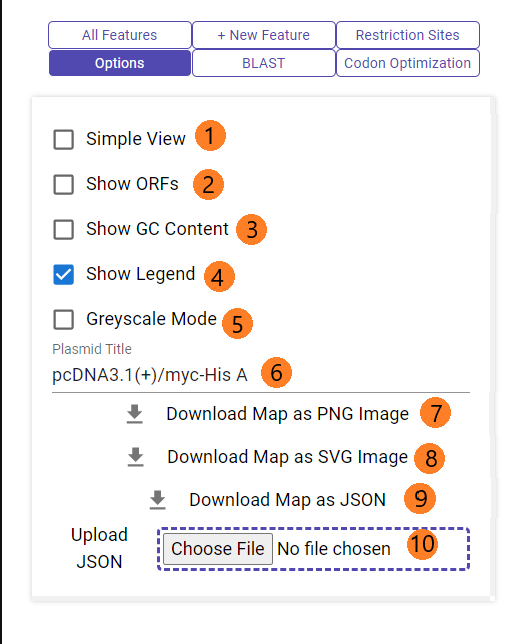
The "Options" tab allows users to change miscellaneous esthetic properties.
1. Toggle simple view (also disables certain other features)
2. Show/hide open reading frames
3. Show/hide gc content graph
4. Show/hide legend
5. Toggle greyscale mode. You can still manually alter the colors of each legend item by clicking on the color swatch. This enables you to create maps where everything is black and white except features that you want to focus on.
6. Change the name
7. Download map as a PNG file
8. Download map as an SVG file
9. Download map JSON file (so you can save and edit it later)
10. Upload previously downloaded JSON file to resume editing that map
BLAST Plasmid Nucleotides
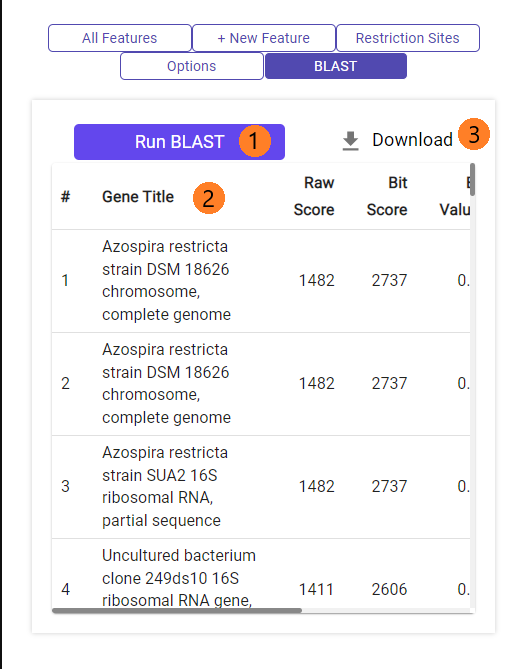
You can run BLASTn against NCBI's nt database.
1. Click on "Run BLAST".
2. After BLAST is complete, a table will appear with all the hits (at most 50, in descending order of raw score).
3. You can download the table as .csv file.
Codon Optimization
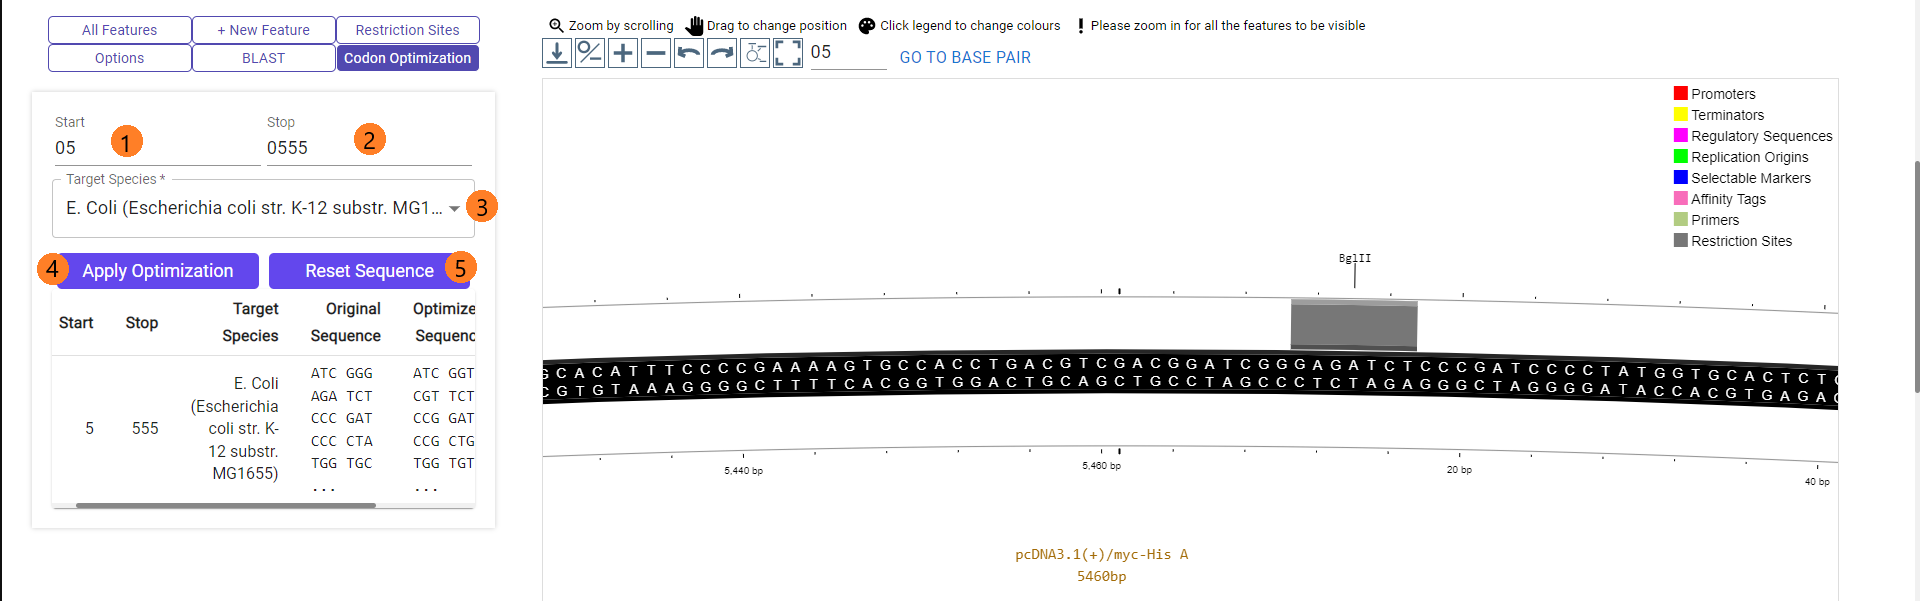
PlasMapper 3.0 offers an optional feature to apply codon optimization for common model organisms like mouse, zebrafish, e. coli, etc.
1/2. Set the start and stop basepair positions. You may use the 'go to basepair' option above the map to view the exact sequence.
3. Select the target species which corresponds to your expression system. Currently there are only the 7 most commonly used model organisms available.
4. Press on the "Apply Optimization" button to retrieve an optimized version of your sequence (from start to stop positions) and apply it to the sequence.
5. You may also remove the optimized sequence and revert to the original sequence by pressing the "Reset Sequence" button. If an optimized sequence is currently applied, that row on the table below the buttons will be shaded light blue. If the shade is white, it is currently not applied.
Saving Edits for Later
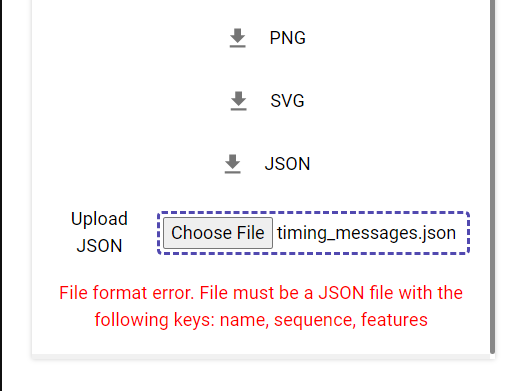
If you would like to come back to a map later, but have already made edits to the sequence or features via our editor, you can save it as a JSON using the "Download JSON" button.
You can then upload that JSON file using the "Upload JSON" button below when you come back to it another time.
If there are any issues with the file, PlasMapper will not accept it and show an approrpiate error message (example in image). To ensure such issues do not occur, please make sure that you are uploading a JSON file that was generated by PlasMapper.
Map View
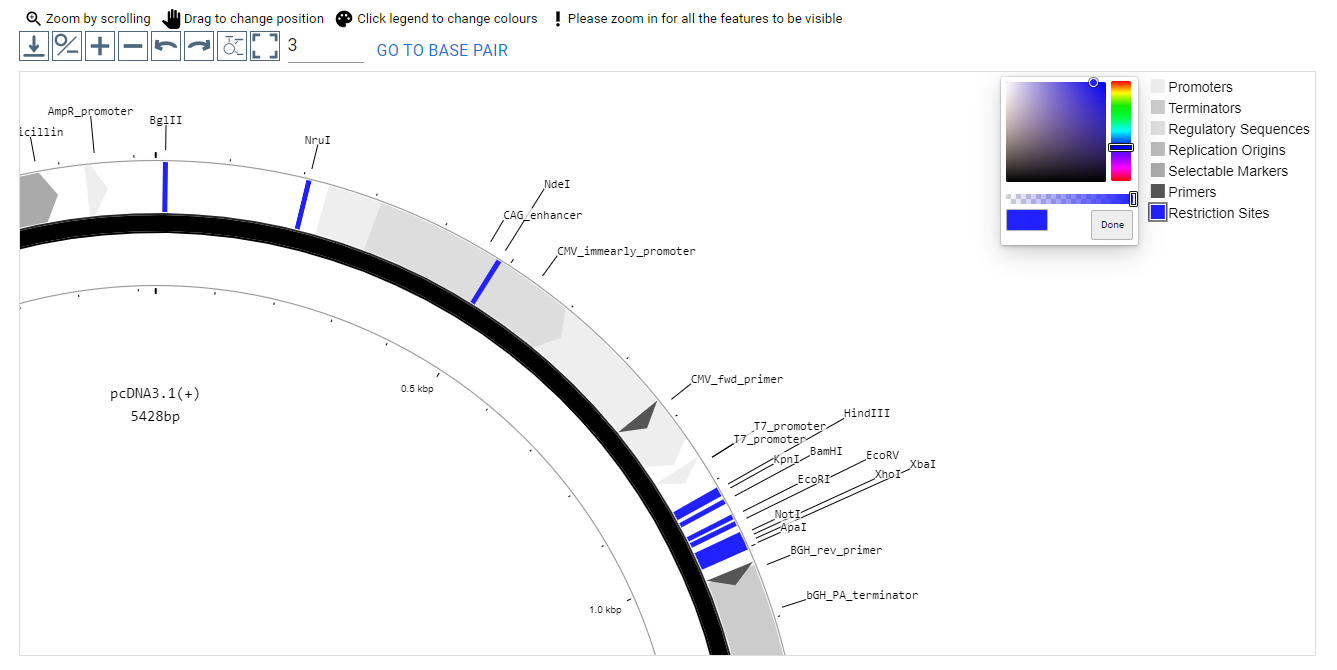
The map view on the right hand side of the page supports click and drag movement of the plasmid map around the viewport, clicking on a feature arrow to open that feature's details in the "Features" tab, scroll wheel zoom in/out, and customizing the legend colors by clicking on the colored box to the left of each legend entry.
Just under the map view, there are several buttons you can use to manipulate the map:
- "Download Map PNG, SVG and JSON" will download the map as all three formats in one click
- "Toggle Linear/Circular Format" will toggle between linear and circular format
- "Reset Map" will reset the map view to its original state (i.e. zoomed out and centered)
- "Zoom In" will zoom in on the map
- "Zoom Out" will zoom out on the map
- "Move Left/Counterclockwise" will move the map left
- "Move Right/Clockwise" will move the map right
- "Toggle Labels" will toggle the feature labels
- Zoom in on particular base pair position using the "go to base pair" button
- Edit specific feature color using the color swatch on the legend item
Text Editor

Use the text editor to view and edit the sequence. You can find it directly below the visual map.
1. The sequence is divided into segments based on the features. Click on one to open it up on the left.
2. The sequence is split into pages of 1000 bp each. Use the arrows or type in a page to switch pages.
3. You can edit the selected segment, on the selected strand using this. There is a preview of the complementary strand beneath.
4. Click "Swap Strands" to change the strand you are editing.
5. Click "Delete entire segment" to remove the segment you are editing.
6. Click "Save changes" to save any edits you made to the segment. This will reflect in both the textual and visual editors.
7. You can also insert novel features here. Use this box and click "Insert Before" to insert it directly before the selected segment, or "Insert After" to insert directly after.
Download Text Map

You can click on the "Toggle Downloadable View" to change the view of the text editor to a download-friendly format. Then you can click "Export As PNG" to download the text editor as a PNG file.
If you would like to keep the original coloured box format, we recommend using your computer's screenshot tool (e.g. "Windows + Shift + S" on Windows or "Shift + Command + 4" on Mac) to take a screenshot of the text editor.
Header

The header bar contains several helpful links and utilities.
By clicking the PlasMapper 3.0 icon, a user is returned to the homepage of the server.
By clicking the "Home" button, a user is redirected to the homepage of the server.
By clicking the "Search" button, a user is redirected to the "Browse Plasmids" page.
By clicking the "Help" button, a user is redirected to the help page you are currently viewing.
By clicking the "About" button, a user is shown the details about the PlasMapper 3.0 server.
By clicking the "Source Code" button, a user is shown a link to the source code for the webserver, hosted on GitHub.
By clicking the "Citation" button, a user is given details about how to cite the PlasMapper 3.0 webserver.
By toggling the light/dark mode switch in the top right corner, a user can switch between light and dark themes of the website.